Learn how to create a snippet that will allow you to copy Wordpress posts easily. Ok, so you will need a plugin called Snippets but it's one worth having as it allows you to extend the functionality of Wordpress easily
Read More »

FacetWP is a must-have plugin for WordPress which comes packed with powerful features that allow you to filter the custom fields data from your posts (and CPTs). This enables users to filter the results of a page to the criteria they select and allowing powerful search capabilities and a better user experience all round.
This is especially useful when used with WordPress plugins like Toolset or Advanced Custom Fields, where you want to display a string or value from custom fields as checkboxes, dropdowns or search boxes for the user to select as a filter to narrow the results.
But the problem comes in when various plugins store that data in different ways...
How do I display serialised data and arrays as a filter with FacetWP? While FacetWP displays custom field values from plugins such as Advanced Custom Fields which has built-in integration. Toolset is one such plugin that uses a serialised data array for its checkboxes (amongst other fields) which FacetWP does not support... At least not right out of the box, however the solution below allows FacetWP to read the serialised data array.
An example of this can be seen below where FacetWP is unable to index and display serialized data (in an array) which is created by a Toolset checkbox . Some plugins work with strings whereas others work with more complicated fields such as arrays. Some of which can cause issues.
The raw value of an array for a custom field would look like below on your database. Where "Wholesale" is the portion of it that's desired for the final frontend filter.
Example of a custom field value stored as an array in the wp_postmeta table:
a:1:{s:64:"wpcf-fields-checkboxes-option1";a:1{i:0;s:9:"Wholesale";}}If you are using a WordPress plugin (like Toolset) that uses data arrays and you'd like FacetWP to be able to use that data; then further below is a custom code snippet which is needed for FacetWP to be able to index the data correctly and display as a filter. An example of these filters can be found on our wordpress plugins page on the left hand side under the "Filters" heading.

The PHP code snippet below is needed to adjust how the FacetWP reads the data when it is stored as an array.
<?php

function fwp_index_serialized_field( $params, $class ) {
    if ( 'service_type' == $params['facet_name'] ) {
        $cf = (array) $params['facet_value']; // already unserialized
        foreach ( $cf as $row ) {
            foreach ( $row as $val ) {
                $params['facet_value'] = $val;
                $params['facet_display_value'] = $val;
                $class->insert( $params );
            }
        }
        return false;
    }
    return $params;
}
add_filter( 'facetwp_index_row', 'fwp_index_serialized_field', 10, 2 );
// Code snippet provided by Matt, the FacetWP plugin developer on github.
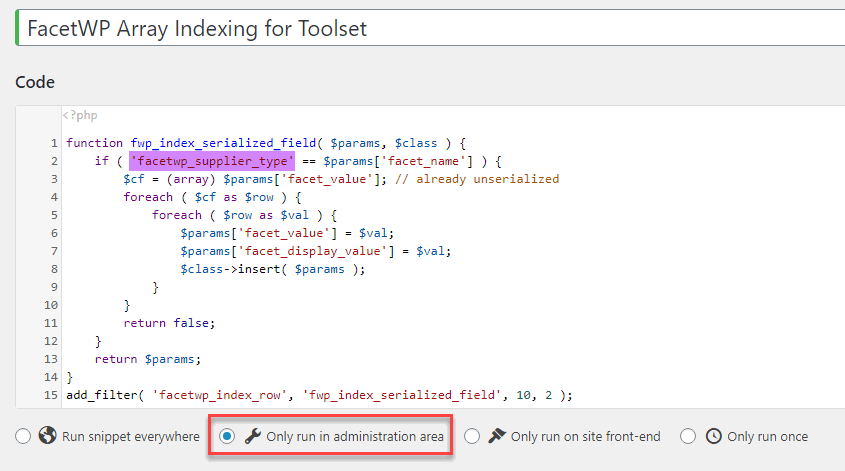
Your snippet should look like below screenshot. Remember to replace "service_type" from above with your actual facet name as found on your Settings → FacetWP page.
For this example the replaced value can be seen highlighted below, yours will be different.
Save the snippet and check "Only run in administration area" (as the indexing happens on the backend).
Multiple Facets with arrays? If there is more than one facet with a serialised array then you'll need to add the || "or" boolean operator to the if statement for each facet, like below.
if ( 'facetwp_supplier_type' || 'facetwp_another_type' == $params['facet_name'] ) {That's it, all done. Clear the website's cache (including all CSS, JS files etc). Open your website and visit the page where the filters are located then hit Ctrl+F5 to refresh. If all went well your new filter should be displaying.

With 20+ years in eCommerce and a proven history of scaling a 7-figure business, I know how to transform challenges into opportunities for growth. As the former Head of E-commerce for a European food tech company, I managed 14 e-shops across Europe and South Africa. Now, I specialise in helping professionals like you unlock the potential of AI automation for your business.
Over 1,800 students have already enrolled in my online courses to master these skills. Whether you’re looking for hands-on AI automation services or want to upskill with my courses, I’m here to help. Connect with me on LinkedIn to discuss your needs or join my programs to start building smarter, more scalable systems today!
Learn how to create a snippet that will allow you to copy Wordpress posts easily. Ok, so you will need a plugin called Snippets but it's one worth having as it allows you to extend the functionality of Wordpress easily
Avoid the drawbacks of machine translation and appear like a local in any market you sell your products or services. Discover the best translation services for ecommerce businesses, and learn how to use them to create high-quality translations.