Learn powerful Gmail tricks and tips to boost your productivity. You'll discover some lesser known Gmail hacks for automating email tasks, optimal settings, keyboard shortcuts and general productivity tips for better email management.
As a busy digital professional, email is one of those tools we simply can't do without in the modern workplace. It has become both a means of communication and a daily task list. However, email can take over your life - but only if you let it. Sure, you can reduce the number of emails by using non-email platforms like Slack or other instant messaging apps for quick messages to your team (which can help to cut down on emails sent and received) however these still need your time and attention, now just in a different format.
Even after you've set up all your fancy filters using advanced search operators for Gmail - or any other Gmail tricks - the vast majority of those received emails require a response, action or even just need to be deleted from your inbox - all of which take time.
You may have heard of the concept "Inbox Zero"? Well, it's not a realistic measure of productivity, and you will struggle to find anyone that is able to do this consistently. The reality for most is that just as soon as your inbox is cleared (and you're basking in that Inbox Zero Glory) it has filled up again.
The bottom line is that email is here to stay and is essential for doing business, and it's a massive time drain! Time that could be spent doing more important tasks. So it is vitally important that the time spent in your inbox becomes as productive as humanly possible, and it should not keep you from crushing your daily task list and moving you (and the business) forward.
Some shocking email statistics:
The average professional spends about 28% of their workday reading and answering emails - according to a McKinsey report
Adobe surveyed over 1,000 American workers and found that the average user spends more than 5 hours per day checking the email
The average worker will receive over 120 emails per day. Business owners and CEOs can receive 500+ emails per day
In this hands-on article you are going to learn some of the best tips and tricks for maximizing your productivity and time when it comes to email management inside of Gmail. You'll discover some lesser known Gmail tips and tricks, key strategies and concepts for better managing your time when it comes to email, Gmail's optimal settings, keyboard shortcuts, automating email tasks and general productivity hacks for using Gmail.
Before we look at some of the Gmail tricks, first let's discuss some key email productivity concepts.
Email Productivity Concepts
With email taking up a big portion of the workday it's essential to use that time as productively as possible. Many of the top time management and productivity concepts can be effectively applied to email management as well.
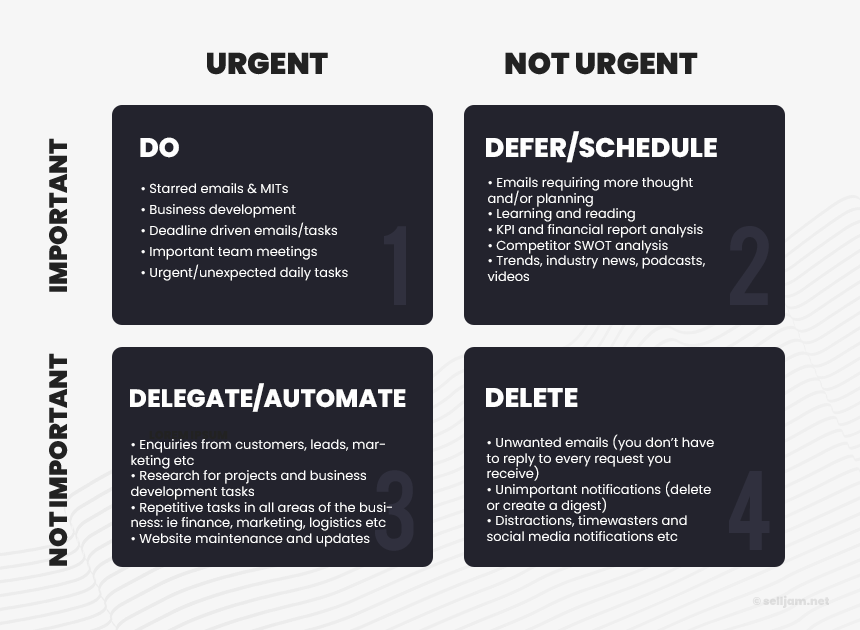
#1 The 4Ds of Email Management: Do, Defer, Delegate or Delete
The 4D method is originally a time management principle, but it's easily transferred to email management and it's also an effective way to process emails in your inbox.
How it works is that - and in no particular order or the order that works best for you - you would perform the following actions for all emails in your inbox.
Delete: normally done 1st, this action will help to clear out the clutter and any emails that have missed your Gmail filters or should have been sent to the spam folder.
Do: if it's something that will only take a minute or two (max 5 mins) then do it straight away and just get it done.
Defer/Schedule: for emails that cannot be actioned right away, need more thought and planning, or you're waiting on someone/another task to be completed first, then defer this email/task for a later stage. This is where the snooze action comes in handy.
Delegate/Automate: apply the 80/20 rule to the bulk of your inbox and focus on 20% of emails/tasks that matter - then delegate or automate the rest. The goal here is to get as much off of your plate as possible so you can focus on the stuff that matters.
Anticipate Scenarios: when delegating emails and tasks to others, try to anticipate a few possible scenarios or outcomes to save on future replies or communication needed. Give the "next steps" for each outcome in the very first email - Ie a sort of "if this happens, then try that" for the person receiving the email.
#2 The Five Minute Email Rule
One surefire way to reduce the amount of time spent on replying to emails (and this also works well when batching email replies) is to time them and use the 5-minute email rule.
Parkinson's Law is the adage that "work expands so as to fill the time available for its completion"
This 5 minute email rule puts Parkinson's Law into effect. By giving yourself only 5 minutes for an email (or 90 minutes for a batch) the objective is to become hyper-focused and complete everything in the time given.
Timing Your Emails & Tasks
It should be noted that the below timer technique is not intended for long term use - at least if you plan on using it on a per email basis. It isn't practical having to reset timers for each and every email you send in a day. Although it is great for bigger batches or time periods, for example, where you give yourself 90 minutes to get through all emails in your inbox. It works especially well for task-based activities where you want to only allow a fixed amount of time to spend on each task. Then once the timer is up, move on to the next one.
The use of it is mostly intended to gauge how long you normally spend on an email and then to improve and reduce that time for future emails (and tasks). After using this timing technique for a short period of time (try it for a week) you should then develop your own internal clock that will mostly keep emails within that 5-minute timeframe.
For the majority of your emails: 3-5 minutes is a good amount of time to strive for on each - and 5 minutes per email should be the max amount of time given for standard/common email replies. Naturally, there will always be exceptions to this rule where lengthier and more detailed emails will be needed.
Keeping emails to a max of 5 minutes also ensures that the reading time of that email is short on the other end as well. More than that and it might be better suited to a call or a meeting - where it could be batched with other similar tasks or topics to discuss. Less than that and you may want to consider if email is the best format, and would an instant message (Slack, Google Chat), or simply a comment (@person) on the doc or sheet work better.
Generally I've found that instant messaging (via Google Chat or Slack etc) is best used for project-based discussions with team members (where the context is already known), or where a single reply to questions, getting quick feedback or simple updates etc will do the trick - so it ensures the "instant" nature of an IM keeps it quick for everyone - this means you're not wasting the same amount of time it would take to compose a new email, add a recipient, add a subject, add a greeting and only then finally getting to the meat of the message 20-30s later!
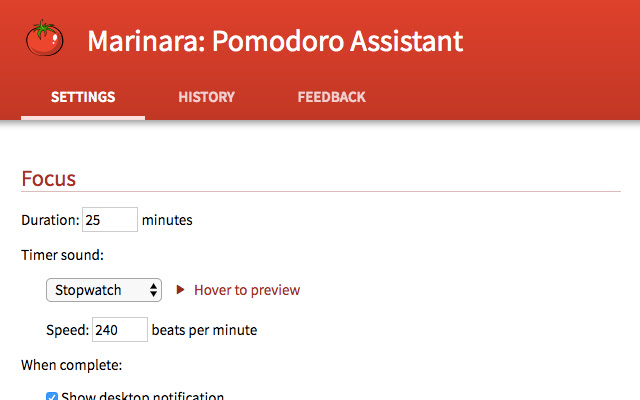
To use this method effectively you could either use the simple and low-tech approach and use the timer app on your mobile phone or go for a much more practical solution and install a Chrome extension such as the Pomodoro Timer - which allows you to start, stop, pause and restart timers at the click of a button as well as provide stats for usage.
#3 Batching Emails
Email batching is a productivity method where you group similar emails together (ie based on their label, the sender, their priority etc) and process them in "batches. This has the benefit of keeping your mind focused (and in context) and helps to ease the task-switching penaltywhich can have a negative effect on brain function and result in a 40% loss of overall productivity during the day. This is due to your brain having to constantly switch between tasks and the delay experienced when your brain has to switch context, process the new information and get to grips with each new task presented.
Batch by label: this is where you batch email tasks based on the priority inbox label system. Do a quick scan of all emails for each section and process them there and then.
Batch by time: a good way to make sure that you're not constantly replying to emails (receiving a reply and then getting into a vicious loop) is to set aside a block of time during the day to only process emails. This could be every few hours or however you feel is most productive and fits in with your workflow and daily routine. The trick to doing this properly is to set a timer for each email (5 minutes at the most), or a timer for the batch - for example, you would allow yourself a fixed amount of time, say one hour or 90 mins, and in that time process all of the emails. After some time practising this method you start to develop an internal timer. This timed method utilizes Parkinson's Law where you automatically pace yourself according to the time allocated to complete a task.
Yesterbox: this is an email management concept that was pioneered by the late Tony Hsieh (of Zappos fame). Essentially yesterday's emails become today's to-do list.
Batch by priority: this approach assumes you are using the priority inbox feature and already using labels to put emails into sections. You would then scan through all of the emails in a specific section and prioritize them based on their importance and/or urgency. Some examples of what to prioritise.
Will this drive revenue?
Will this bring me closer to my current important deadlines, goals or projects?
Is this needed by a team member to complete an important task?
Email Digests: group and batch similar emails using an automation tool like Zapier's Digest tool. This will allow you to see all of your emails and notifications at a glance, much, like a Google custom alerts digest, and give you an overview of what needs your attention. This is very helpful for all kinds of emails (such as notifications, RSS feeds, updates, cc'd emails etc) where they don't necessarily need to hit your inbox but you still need to keep an eye on them. With an email digest, you're able to set when you would like to receive the email digest whether that be daily weekly or monthly.
Reading Pane: this handy Gmail feature (Settings → Inbox → Reading Pane) allows emails to be processed in a rapid-fire way and can help you blaze through a list of e-mails in an impressive amount of time. This adds a new split window showing the full email message alongside your main list of emails in your inbox. You're then able to quickly move (using the down/up arrow key) from one email to the next and decide whether to: DO, DEFER, DELEGATE, or DELETE
Gmail Settings For Maximum Productivity
The first step is to customize and set up Gmail to work how you want it, and gear it up for maximum productivity. Below are the most important settings for maximum Gmail productivity. I won't touch on every single setting as many of them are self-explanatory, however if you want a great list of tips and tricks for common Gmail settings then check out these two articles
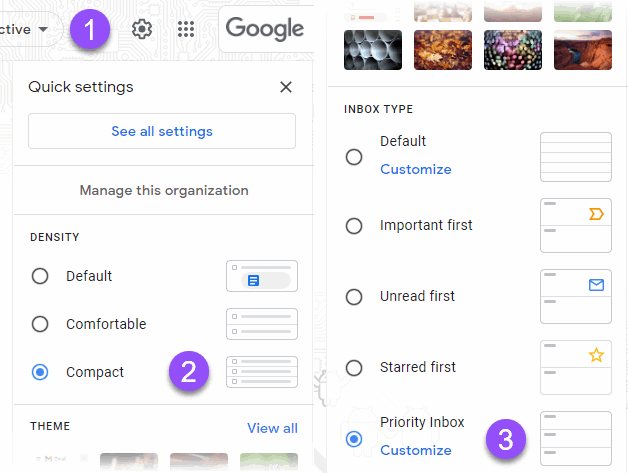
To kick off with a few settings let's look at the Quick Settings. From inside Gmail click on the gear icon in the top right-hand corner. The below window will appear. Depending on how close together you'd like the elements in your inbox, set the Density to Compact. Then set Inbox Type to Priority Inbox. The Priority Inbox is where all the magic happens and it allows you to use labels as different sections in your inbox. We'll dive into the priority inbox settings further down.
After you've enabled the options below then you can click on the See all settings link to go to the main settings page, where you will see the settings tabs (General, Labels, Inbox Etc) containing all of the settings - the first one being the General Tab.
General Tab
Undo Send: 30 seconds. Undo send is a handy feature to have and allows you to stop an email from being sent after clicking the send button. Setting this to the max gives you more time to correct little things you may have missed while creating your email. This is useful when you suddenly realize you didn't include something, or forgot to attach a document etc.
Smart Compose: Writing suggestions on. This is a handy little feature that will give predictive writing suggestions as you compose an email.
Smart Reply: Smart Reply on. A great feature that will display quick replies (commonly used by you) this allows a quick reply or "boss email" type reply to be sent in two clicks.
Keyboard Shortcuts: Keyboard Shortcuts on. This handy setting is a very important one and will enable the keyboard shortcuts that are specially designed for Gmail.
Personal level Indicators: Show indicators. A great and sometimes overlooked setting that allows you to see at a glance if an email was sent directly to you, or to a group as part of a mailing list. Google describes this feature as: "Display an arrow ( › ) by messages sent to my address (not a mailing list), and a double arrow ( » ) by messages sent only to me." This makes it very helpful to see at a quick glance if an email was sent directly to you or sent to a group/mail list.
Conversation View on: this setting groups together replies into one single message in your inbox, and also ensures that the entire email history is not included with replies.
#4 Top-Down Priority Inbox
The Priority Inbox setting in Gmail allows you to customize what appears and take a top-down approach to your emails
Skipping the Labels Tab (above), which I'll dive into next. The Priority Inbox is a very powerful feature that Gmail provides. It allows you to set up your inbox to display labels as sections in a sequence that you define.
After much experimentation, I have found the following method to be the most effective and productive way to organize my Gmail emails and manage the barrage of emails flowing in on a day-to-day basis.
How The Top-Down Priority Inbox Works
Set up your Inbox Sections to the following. You then take a top-down approach to get through each section. What I will normally do first thing when opening Gmail is collapse all sections (and distractions) except for #1 the Starred emails section.
#1 Starred: is "the money section" which contains all of the MITs/emails that should be done first before anything else in the day in order to be as productive as possible. It's quite likely that Gmail is not your only productivity tool, so this is can also be where important notifications (that you set) will come from other task apps such as Trello, Asana, Todoist etc. You get the idea.
You're The Star: What makes the starred email section so powerful (and why it should appear first) is that emails only appear here because you have manually starred them or have set up Gmail filters to only star certain emails. These can either be your most important emails or email notifications about tasks relating to important projects, business development etc coming from outside of Gmail. You are in control of what makes it on to this list!
How many of these MITs (most important tasks/emails) should I have in the Starred section? As a general rule of thumb aim for about 3-5 emails in this section, and aim to get them done in that same day (ideally before doing anything else) or if they are more project-based and complex in nature then aim for 3-5 in a week. The trick is to be absolutely ruthless with what makes it onto your starred list.
You can filter how many items show in the section by clicking the options drop-down to the right, and select "Show up to 5 items". This will ensure that this section does not become unmanageable.
The following inbox sections are the ones that I use in my workflow daily. Over the years I have found this to be the most efficient way to get through everything. It takes a top-down approach to get through everything in a workday.
Starred: unlike the other Gmail system labels, Star emails are manually set by you. This makes them very powerful for organizing what is important to you by using this method. You can either manually star emails that become important, or you could create powerful filters to Star certain emails that come into your inbox. What further boosts the starred emails superpowers is that you are able to change star types and colours by clicking on the star. This becomes useful if you have your own internal categorizing, or colour-coded system for certain emails - ie projects are a purple star or "awaiting feedback" is the question mark star.
Important: these are all of the emails which Gmail will consider important, mostly due to the email being sent directly to your email address (when not considered spam). After using Gmail for some time the algorithm gets an idea of what it should mark as important. You can help Gmail along with this by clicking the personal level indicator on emails it might have missed.
[Insert Your Most Important Label]: all other sections use Gmail's system labels (ie Important and Everything Else) choose an important label that you have created - and set this to position 3. In the screenshot above I have this set to a payment label for my suppliers and vendors. Choose any label that's important and that might need to be managed frequently.
Everything Else: the Everything Else label becomes a kind of catchall for your email. So while it is important to have it there to keep an eye on things and check for any emails that might have been missed, or that may have dodged any filters you have created. It is a prime candidate for the 4Ds Time Management Technique seen above. Essentially the 4Ds Technique (derived from the Eisenhower matrix) is a rapid-fire way to handle your email workload where you either Do, Delegate, Defer or Delete an email as you are viewing it.
Why not simply set all Inbox Sections to my own created labels? This can also be done if you'd like. However if you make use of the snooze function, Gmail works in such a way that when an email has a label assigned to it, if you snooze that email it will still appear in that inbox section's label. Albeit now just with a snooze indicator on the right-hand side. So this pretty much makes the snooze function useless.
#5 Multiple Inboxes & Email Accounts
A powerful function in Gmail is the ability to add multiple email accounts. Once you have spent some time and set up Gmail for optimal productivity, and it's working just how you like it, you are able to take things a step further and centralize all of your emails and retrieve them from any other (IMAP or POP) email services or accounts you might have.
Check email from other accounts (Settings → Accounts): add any other email accounts or services you own (IMAP, MS Exchange or POP3) to retrieve those email into Gmail. See how to retrieve emails from other accounts.
Send Email As (Settings → Accounts): this feature comes in handy when you have multiple email accounts or aliases set up for different purposes, brands or websites and don't need dedicated email accounts for each of them and simply want to forward those email to your main Gmail account, but still be able to retain the domain name and "branding.
Once you have the above to settings enabled and active you can then add a custom signature (Settings → General → Signature) for each email account.
#6 Gmail Filters & Labels
Gmail filters play an important role in getting your inbox under control. The filters allow you to categorize, redirect and add labels to incoming email on autopilot, and at the click of a button. The labels feature works much like folders in any other email software such as Outlook.
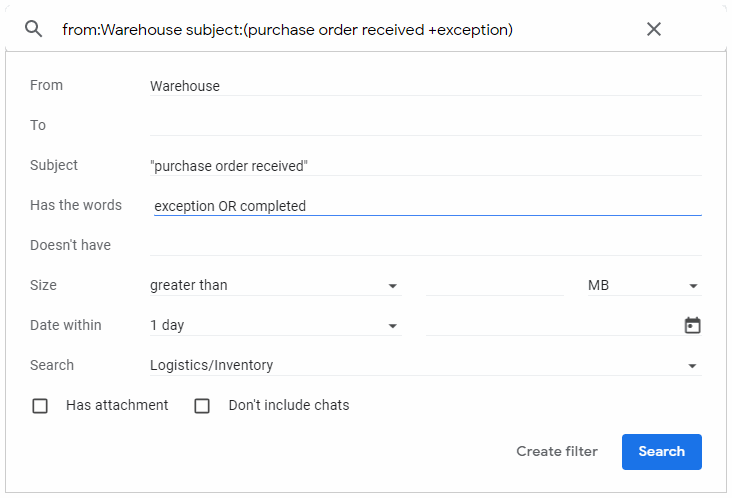
Where labels become powerful is when they are combined with search operators to create rule-based filters. Using OR you can join together two phrases in a field.
Standard Search fields and search operator examples:
Subject (email subject) - eg New order placed OR New order Query, New order
Has the words (must have the words) - eg "Possible error on your" - by using inverted commas you're able to filter via that exact phrase between quotes. Not case sensitive.
Doesn’t have (doesn’t contain) - eg payment successful, "updated successfully"
Has an attachment - check or uncheck as needed
Don’t include chats (exclude any chat conversations) - check or uncheck as needed
Size (the size of the email) eg greater than 1mb
Date within (time range of when email was received) - eg 1 month
Search (the label to search within) - this is powerful if you want to create multiple filters for specific labels.
#7 Advanced Gmail Search Operators & Filters
The following operators can be used with the fields above to add more power to your Gmail search and filters. Search operators can also be combined to get very filtered results.
Gmail does most of the heavy lifting and adds the operators as you enter them into the fields. These are listed below if you'd like to try some of your own combinations. View the official list of search operators.
Example of search operators to be used in a filter. The Subject field has a search phrase (in quotes), so it will only look for messages with that exact phrase. The Has The Words field has two words that should be found in the email
AND: Gmail combines all search terms with an invisible AND operator by default - eg searching for Woocommerce Orders finds all emails containing the words Woocommerce and Orders.
OR: filters emails containing at least one of two terms or expressions - eg searching for Woocommerce OR Orders finds all emails which contain either the term Woocommerce or the term Orders.
“” (double inverted commas): filters terms (not case sensitive) between the inverted commas - eg “Booking Confirmation Date” will filter or emails with that exact phrase
+ (Plus sign): filters that word after the + exactly - eg Has the words: "New order placed" +London
– (Minus sign): this works much like adding a term to the Doesn't Have field however you can also use the "-" in other fields such as the subject field. Eg Subject field: Purchase Order Status -packing will filter all emails with the subject term "purchase order status" but not where "packing" also appears.
() (Parenthesis): This is useful for filtering terms as a group but where each of the terms is not necessarily used together. Eg Has the words: (shipped orders London) would return the emails containing the phrases "shipped" and "orders" and "London".
Turbocharge your labels by using #hashtags. In addition to adding a label when composing an email (click 3-dots icon bottom right of compose window → Labels), using #hashtags with your team members is a great way to help each other organize email more efficiently and also works with replies and if email topics being discussed need multiple labels.
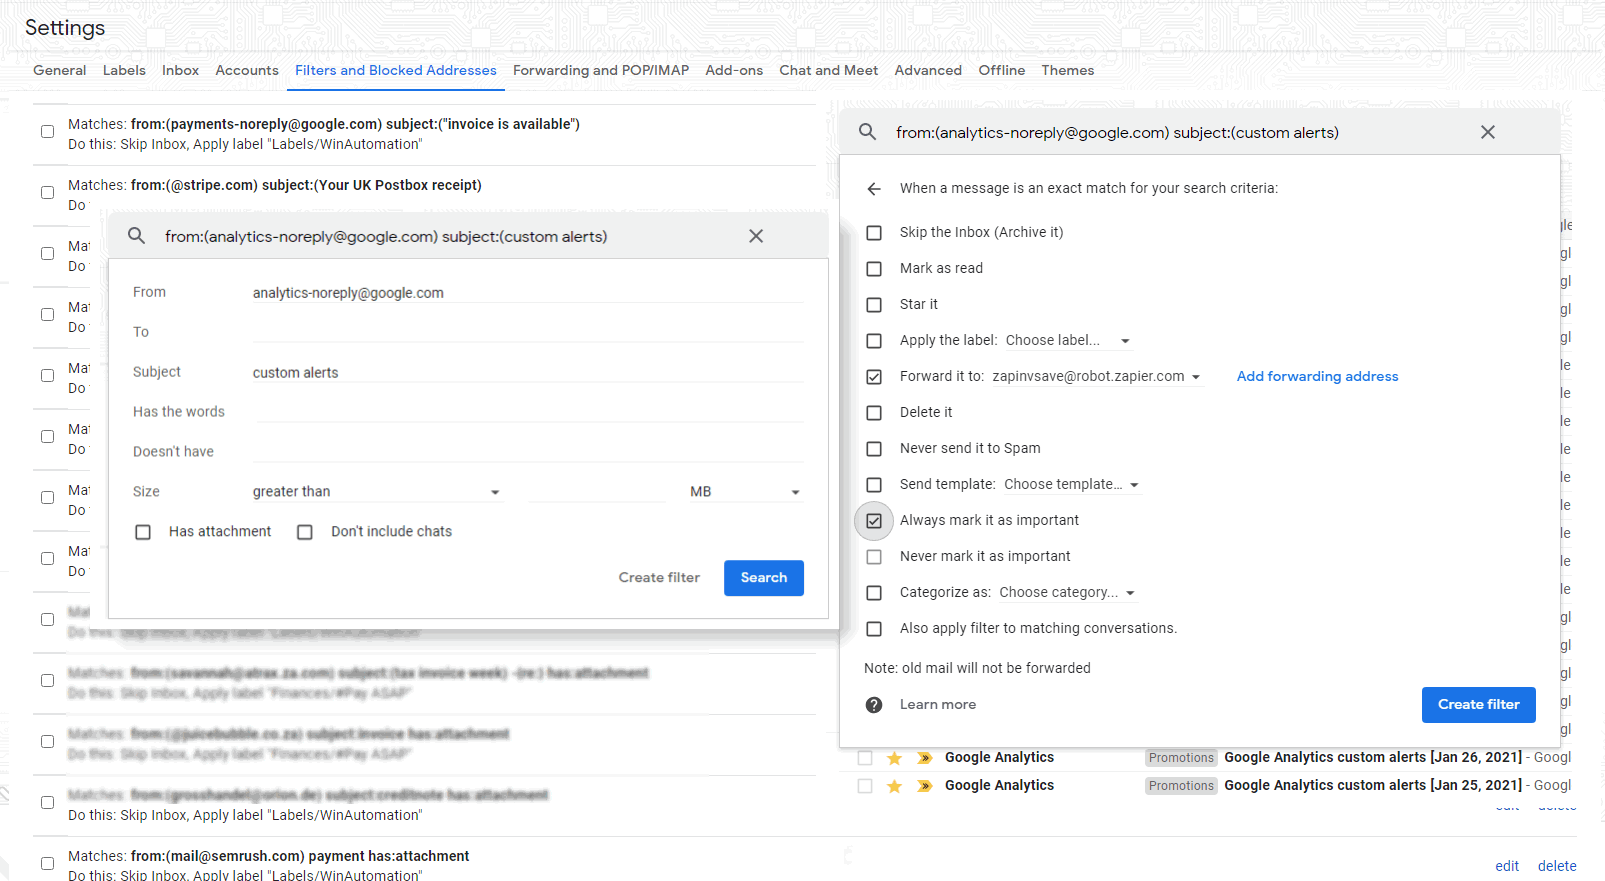
How this works is that when sending emails to others or where team members send emails to you they include #hashtags (in the subject or email body) to label the emails. These hashtags don't necessarily need to appear in the subject and could be far more inconspicuous by adding them to the footer of your messages/replies. Then create a filter rule for those hashtags. When those emails reach your account they are labelled and filtered automatically - and can have multiple labels if needed. For this to work your team should already know which hashtags to use for these types of emails. These don't need to be all of them, just a handful of important ones that are used frequently
Spice up your productivity by adding hashtags to emails: for example, I've created a filter rule where if any email received contains #payinvoice (seen in the above screenshot and a hashtag the team knows to use) in the subject or body of the email, it skips the inbox and is automatically labelled as #PayASAP and ready for when payments need to be done to suppliers and vendors. However, this could be any label depending on your workflow.
Quickly Add/CC People to Emails. Gmail Workspace has recently added a nifty new feature where if you start typing out the @ symbol (in the body of your email) followed by the person's name like @john it will automatically add that person in the To field for the email.
#8 Gmail Keyboard Shortcuts
No Gmail tips and tricks article would be complete without some essential keyboard shortcuts. Keyboard shortcuts in Gmail are a great way to improve productivity. Memorizing just a few of the essential ones can shave off minutes per day and hours per month. For keyboard shortcuts to work in Gmail, make sure that these are switched on by following these steps below.
Go to your Gmail settings → scroll down to keyboard shortcuts and select keyboard shortcuts on then click save.
While this isn't the full list of Gmail shortcuts - as there are plenty. This is a list of the most frequently used ones in my daily workflow, that might be useful to you as well. Below commands are for PC and Mac.
Compose & Chat
Formatting Text
c = compose new email
⌘/Ctrl + b = bold
⌘/Ctrl + Shift + c = add CC recipients
⌘/Ctrl + i = Italics
⌘/Ctrl + Enter = send email
⌘/Ctrl + u = Underline
⌘/Ctrl + k = add a link
⌘/Ctrl + Shift + 7 = Numbered list
p = previous message in an open conversation
⌘/Ctrl + Shift + 8 = Bulleted list
n = next message in an open conversation
⌘/Ctrl + Shift + 9 = Quote
. = open more actions menu
⌘/Ctrl + [ = Indent less
l = open label as menu
⌘/Ctrl + ] = Indent more
Ctrl + . = Advance to the next chat or compose
⌘/Ctrl + Shift and + or - = increase or decrease text size
Ctrl + , = Advance to the previous chat or compose
⌘/Ctrl + \ = Remove formatting
Actions
Navigation
r = reply | Shift + r = reply in a new window
/ = search mail
f = forward | Shift + f = forward in a new window
k = newer conversation
e = archive email
j = hold a conversation
# = delete
o or Enter = open conversation
b = snooze
. = open more actions menu
m = mute conversation
l = open label as menu
s = toggle stars
g + i = go to inbox
= or + = Mark as not important or Mark as important
g + s = go to starred conversations
; = expand entire conversation * used frequently saves having to scroll the whole time
g + b = go to snoozed conversations
: = collapse entire conversation
g + t = go to sent messages
Shift + t = add conversation to tasks
g + a = go to all mail
When in doubt: ? = open keyboard shortcut help. This is also handy as it will overlay the shortcuts for all of your Gmail plugins and add-ons as well.
More Useful General Keyboard Shortcuts
When typing out an email in Gmail or a document in Docs the following keyboard shortcuts can come in handy for navigating as well as formatting your text on the fly. These keyboard shortcuts are universal (when on a PC) and should work in Chrome as well as all other applications. Except for Ctrl + which is only for Google apps.
Ctrl + Delete = delete entire words going forward
Ctrl + Backspace = delete entire words going backward
Ctrl + left or right arrows = move cursor by words and not only characters
Ctrl + Shift + right arrow or left arrow = select previous (left arrow) or next word (right arrow)
Ctrl + Shift + end = (from cursor position) select entire line
Ctrl + home = go to start of email/window
Ctrl + end = go to end/window
Ctrl + b = bold text
Ctrl + \ = remove formatting
#9 Gmail Templates & Canned Responses
If you find yourself having to send the same email repeatedly then a Gmail template might help to save a bit of time. However, and disappointingly, the template feature in Gmail is pretty basic and could become a bit messy if you have more than a handful of them - as they need to be manually added when composing an email.
You'd be far better off using an auto text or text expander for this purpose, which I'll discuss later in the post.
Templates can be found when composing an email. Reply or Compose a new email → or reply to Click on the three dots at the bottom right of the 'compose email' window. Then select Templates from the menu.
Pretty tiresome right? Here's a more powerful way to use them...
Use Templates with Filtered Emails
Where these templates become powerful is when they are used in conjunction with filters. Any email that can be filtered can have an automatic reply linked to it.
By creating a filter and using the filter rules: Subject, Has The Words, Doesn't Have in combination with using Send Template: <template> some pretty powerful scenarios can be created.
For example, let's say you needed to create an automation that triggers when a specific type of email is received. Then you would create filters based on each variation of that email (or email content), and check the send a template option at the last step when creating the filter, to send an email template.
#10 Gmail Email Adress Tricks
If you are using the standard Gmail (or with Gmail Workspace) on your own custom domain) there are some Gmail hacks you can use for the name of your email address. With a Gmail address you automatically own all dotted versions of your address. This allows you to essentially change the appearance of your email address while still ensuring that all emails are delivered to you. These tricks allow you to create as many email variations as you'd like and become powerful when used in conjunction with email filters.
So how could this be useful?
Use different email variations for specific purposes like email subscriber lists, or a registered account on a website, or using that email for specific people.
Track exactly where your email might have been passed on or sold to other companies for marketing purposes marketing. ie [email protected]
Create Gmail filters based on these unique email variations to organize email
Gmail Dot Trick
Adding dots (.) anywhere in the address before the at symbol (@) ensures you will still receive that email. Ie if your original email is [email protected] any of the following will work as well. See Gmail help for more information.
The Gmail plus + trick allows you to add and custom keywords after your standard email address. This becomes useful when used with filter rules and allows you to filter on those unique email address variants. This could also be used to create disposable email addresses.
An example of this is using the following email on your favourite productivity blogs and websites[email protected] OR [email protected] for all your travel ideas and news.
@googlemail.com Trick
One last Gmail trick is to change the domain from gmail.com to @googlemail.com. Both work the same, so whether an email is sent to [email protected] or [email protected] they will go to the same account.
#11 Dealing With Spam
Gmail does a pretty good job of detecting and filtering spam for you, however, there will always be those emails that will sneak through and reach your inbox. If after using the standard Report Spam, Block "Sender Name" methods or any of the "Unsubscribe" links provided in the spam email received, you're still swimming in spam then it might be time to try one of the following.
The snooze feature in Gmail is a powerful feature that helps you stay in control of your inbox and can be used for email management in general. It can help prevent important emails and tasks from slipping through the cracks and allow you to keep focused on important tasks that are already in progress.
It is pretty basic though, has a few drawbacks and is best suited for incoming email that you haven't replied to yet, or just simply for emails that you want to pop into your inbox at a later stage. For example: If you want to follow up on an email that you sent to someone you would need to manually go to the send emails folder (shortcut: g + t) and snooze the email from there. If you get a reply from that snoozed email the snooze is cancelled and you have to do the above again.
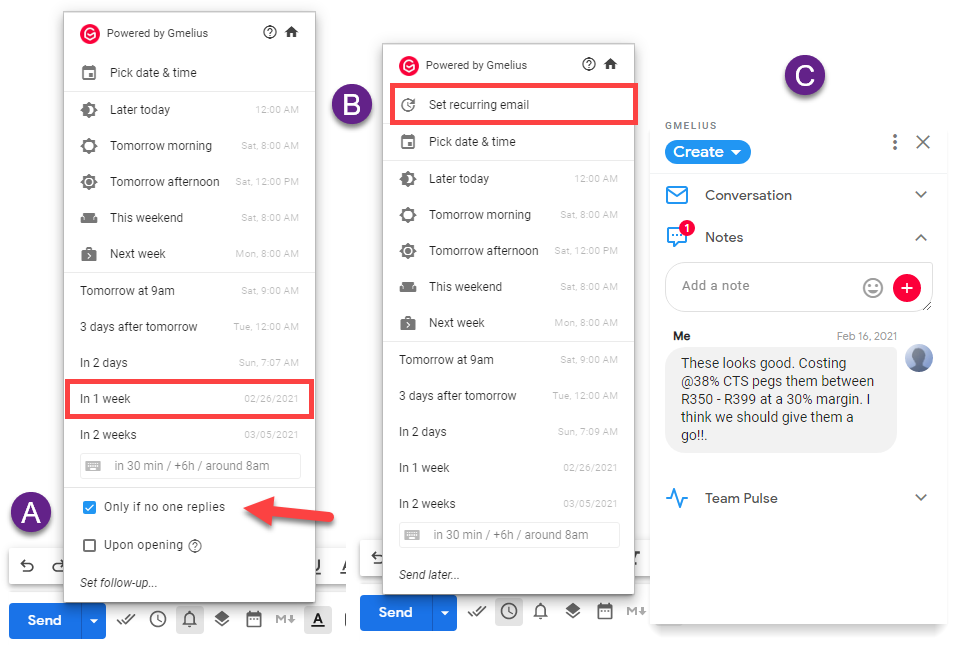
To turbocharge the Gmail snoozing featured plus add much-needed follow-up functionality there is an add-on built to do just that - and it does it well. Gmelius is designed to solve these two problems, as well as a slew of other features that you may encounter when working in a team. The add-on has plenty of productivity and teamwork features; but the follow-up and email notes function are hands-down the two Gmelius features that make it worth the price tag.
The powerful functionality of Gmelius makes it a must-have Gmail productivity tool
A) Follow-up email: this great little feature allows you to set a follow-up reminder when composing an email. This can be set to remind you if you receive a reply or not. This is handy if you know that you are going to receive replies to an email but still need to follow up (and check) in the future.
B) Send later: this feature is much like Gmail's Schedule Send feature but with the added benefit of being able to set a recurring email if needed. This becomes useful for weekly or daily reminders that you send to yourself/your team, or even to trigger automations elsewhere if you have an email parser setup Zapier, for example.
C) Email notes: it baffles me that this is not a standard Gmail feature. When dealing with the constant flow of emails and snoozing some here and there, being able to add notes or your own thoughts (for context or to refer back to at a later stage) is a powerful productivity feature. Adding email notes in Gmail is simple with Gmelius. Your notes in Gmelius can either be private and only visible to yourself, or you can share notes with a team. It's a simple, lightweight yet powerful feature.
Bonus: Get $100 in Credit Test Gmelius risk-free and receive $100 in account credit when you click the link below and discover how Gmelius can super-charge your email productivity.
You're probably now familiar and quite comfortable using Gmail's keyboard shortcuts for the basics like composing a new email (c) replying to an email (r) and forwarding an email (f). Now it's time to type out the reply. You may already be using the template function in Gmail, but have probably discovered that it is quite limited and can quickly get crowded if you have too many templates and need to select one quickly.
Below you'll find some of my best Gmail tips to save time when it comes to writing, composing and replying to emails.
#13 Writing Emails in Markdown
Markdown is a simple language that can easily be used in emails to add basic formatting to text. It allows you to quickly add inline styling and formatting to text without needing to Gmail's formatting tools. This means that you can type out styled and formatted emails that look beautiful in a shorter amount of time, with less clicking.
How to use markdown in Gmail? Using some of the styling from the below table or having a look at this markdown list. Type out your email as normal using markdown tags, then click the M↓ button in Gmail when you are finished to convert the markdown to HTML. Simple as that.
Formatting
Headings & Lists
**bold text** or __bold__ *italic* or _italic_ ~~strikethrough~~ --- or *** (for horizontal rule) > This is a blockquote `code blocks` (use backticks)
#Heading 1 ##Heading 2 ###Heading 3
* unordered list item 1. ordered list item (any number sequence)
#14 Text Expanders & Auto-Text
If you are still typing out each and every word of your email, stop 🛑 you are missing out on a huge opportunity to shave off hours per week spent on emails. Text expanders allow you to create shortcuts or "autotext keywords" that expand into frequently used replies, snippets and even entire formatted emails by only typing out a shortcut phrase. Your snippets will retain all formatting so that emails are presented beautifully once they are expanded - and the best ones work on all of your devices where all phrases synced from the cloud.
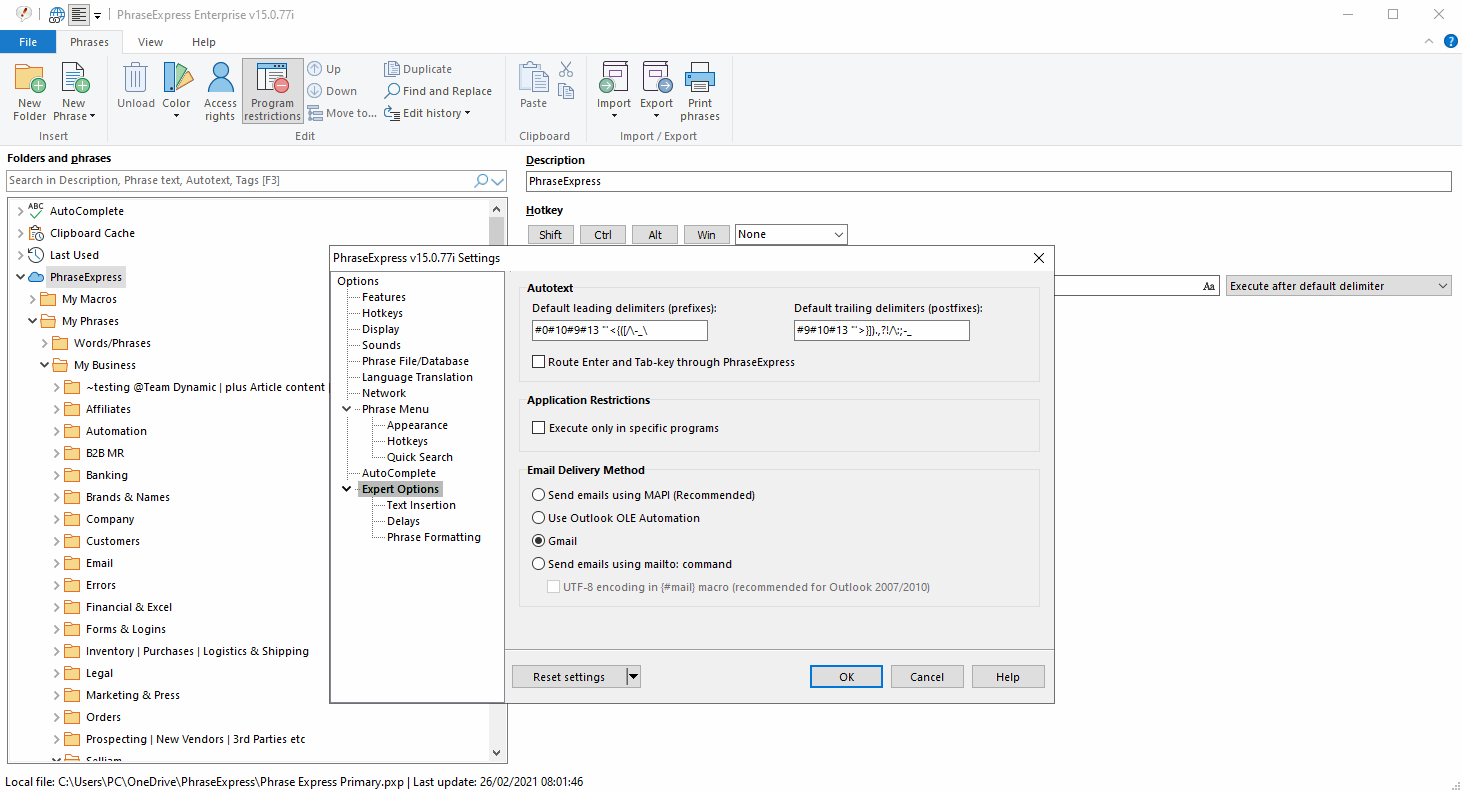
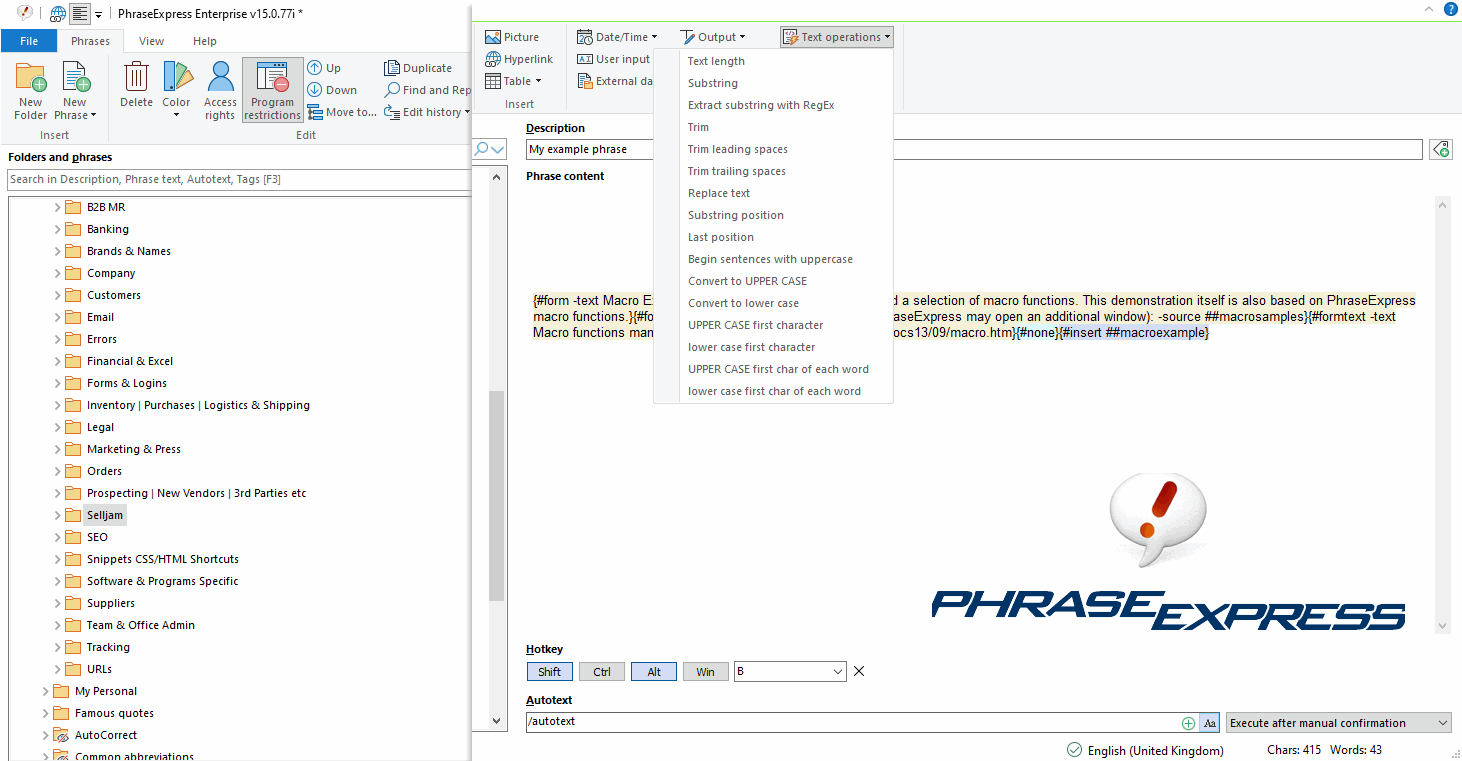
PhraseExpress
This has been my #1 choice of text expander, and has saved hours daily on email replies since 2009 - and it seems with every version PhraseExpress just keeps getting better. Not just for Gmail, PhraseExpress can be used with all applications installed on your operating system and mobile device.
In addition to snippets and common replies, you’re also able to add some powerful automation and macros to your expanded text and snippets.
💖 PhraseExpress Best Features:
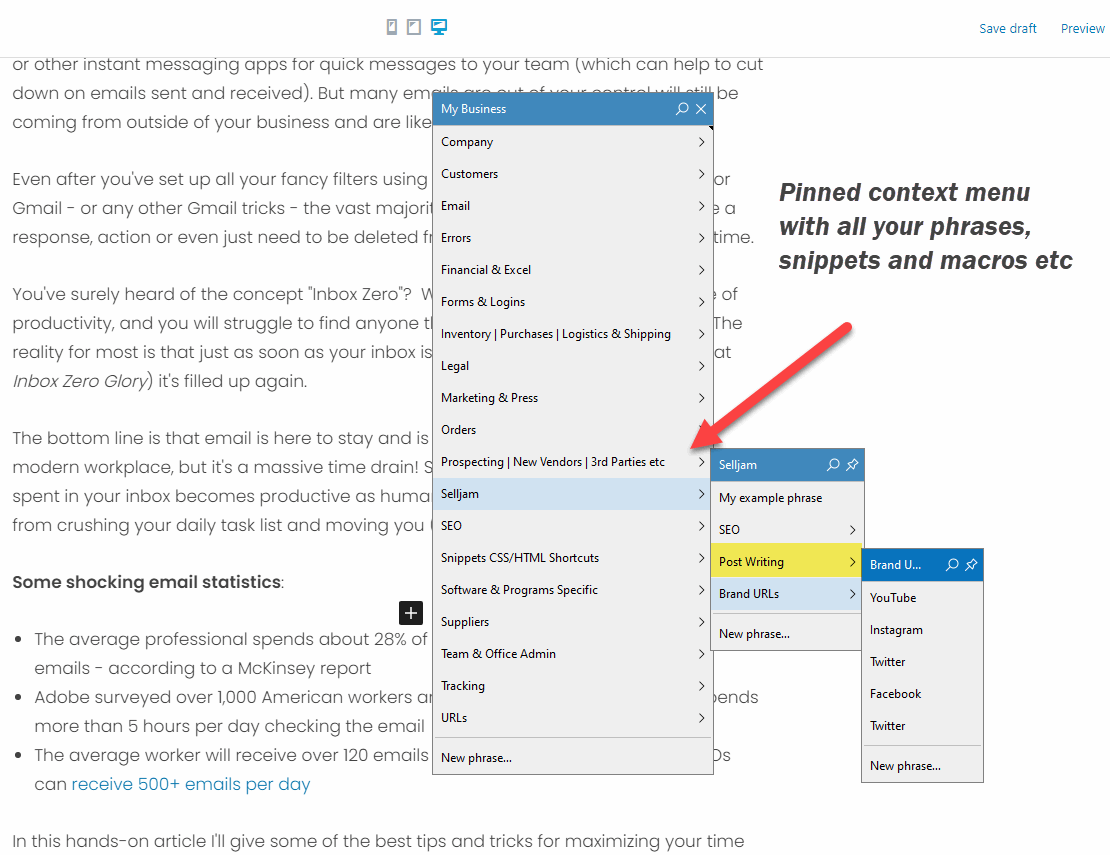
Create snippets and from hotkeys or autotext triggers
Entire folders of snippets categorized into menus that appear (and can be pinned to remain on top) by using a shortcut key. This then gives you access to contextual collections of phrases based on the email or task at hand - for example you could have the following menus pop up based on the context of the email you're working with: Sales, Customer Support, Logistics, Suppliers, Business Development Etc. This would then load up a pinned menu of all the most commonly used replies phrases and snippets you would use when discussing these topics in an email.
Not only restricted to email and can be used in any application on your device (including phrases being synced to your mobile device)
Generate dynamic content
Autotext and spell checking
Floating desktop menus
Perform calculations
Custom user input message forms
Loop functions
Simulate mouse movements (with macros)
Generate entire documents from templates
Import data from external files and even a database
Restrict phrases to specific programs only
Keystroke simulation including special keys to automate tasks.
It may surprise you to know that around 70-80% of this article was dictated. Dictation is one of those lesser known Gmail tricks, but might not be for everyone, especially in noisy office environments. When used properly it can skyrocket your productivity and massively cut the time spent typing emails.
With dictation you are able to slash the time it takes for writing emails by 150%. The average person types at around 40 to 50 words per minute - with an accuracy rate of a little over 90%. Professional transcriptionists might get 50-80 words per minute. Although AI meeting transcription is a powerful option too.
Using speech and voice recognition software you are able to reach 150 words per minute (or more) - and once the software is trained to your voice and nuances, reaching similar levels of accuracy too.
Dictation and voice recognition software has come a long way in recent years. If you've ever tried to use dictation software that came with your operating system or device, such as Cortana and felt that it just falls horribly short of your expectations then don't worry, newer technologies have made it far more accurate and practical for use in the modern workplace. Not to mention giving your wrists and fingers a much-needed break every now and then.
Dictation in Gmail
Google Docs already has "voice typing" built-in. This can be found under Tools → Voice Typing (Ctrl + Shift + S) on any Google Docs document. Which is helpful for drafting out documents, but not very practical having to copy and paste to emails. It's possible in the future that Google will bring this vital functionality to Gmail. But for now, you can achieve this with a browser extension.
Dictation for Gmail: If you're a Chrome user, and looking to dip your toe into dictation and give it a go, there is a very good Gmail dictation extension aptly named: Dictation for Gmail. It is lightweight, easy to access and I have found that the voice recognition capabilities to be really good. This will do a fantastic job of dictating your emails, however, it is only available when inside of Gmail.
Below is an extension that allows you to use dictation for any tab and website in Chrome.
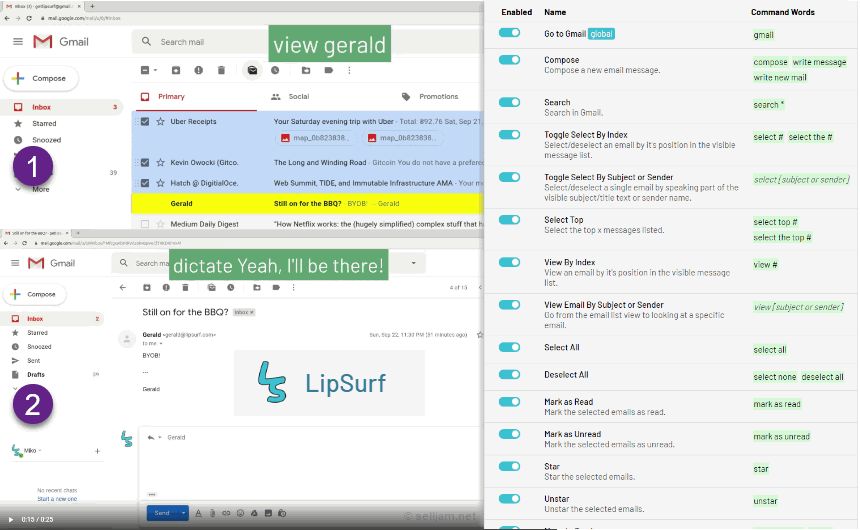
LipSurf Dictation Extension For Chrome
If you want to turbocharge your dictation superpowers (throughout Gmail, Chrome and online in general) as well as be able to issue voice commands then you should try out a relatively new extension called LipSurf. I have been using this for a little over a month now and am mighty impressed with its capabilities and feature set; and also the ability to customize custom commands as well as develop your own plugins to use with this extension.
The LipSurf Chrome extension will change the way you write emails and work online in Chrome
💖 LipSurf's Best Features
Not just a powerful email dictation and voice recognition extension, you are also able to go completely hands-off and select, move, delete, open and perform many other actions within Gmail, Googl Docs, Google Sheets and Chrome in general.
Navigate the web using commands like Go To Url, Go Back, Go Forward, Go To Next Field, Refresh, Zoom In/Zoom Out ...
Browse the web and work with forms, text fields and on-page elements using commands like Copy, Cut, Paste, Press Tab, Press Enter, Press Down Etc
Switch between dictate mode and normal mode. When in normal mode you are also able to dictate shorter pieces of text or enter into dictation mode when you want to dictate entire emails, documents or longer text passages.
Create your own custom commands. Simply export the custom shortcuts file, edit the file and add the custom commands, then import back into Lipsurf.
For Advanced uses and Developers you can create your own plugins using the developer mode
** the above extensions will only work on your Chrome browser for desktop, ie you will not be able to use them on the mobile app versions of Chrome or Gmail.
When you're ready to level up your Gmail superpowers then email automation is definitely one of the first Gmail productivity tips you should try out. Seemingly complex automation workflows can easily be created with just a few mouse clicks. They will keep your Gmail inbox organized and data flowing between all your favourite productivity apps. Let automation do all the heavy lifting and repetitive tasks for you.
Developers and Pro Gmail users are able to use Google Apps Script to enhance Gmail's automation abilities without the need for paid add-ons. You're able code, script and automate Gmail. Check out this list of 19 Apps Scripts for Gmail
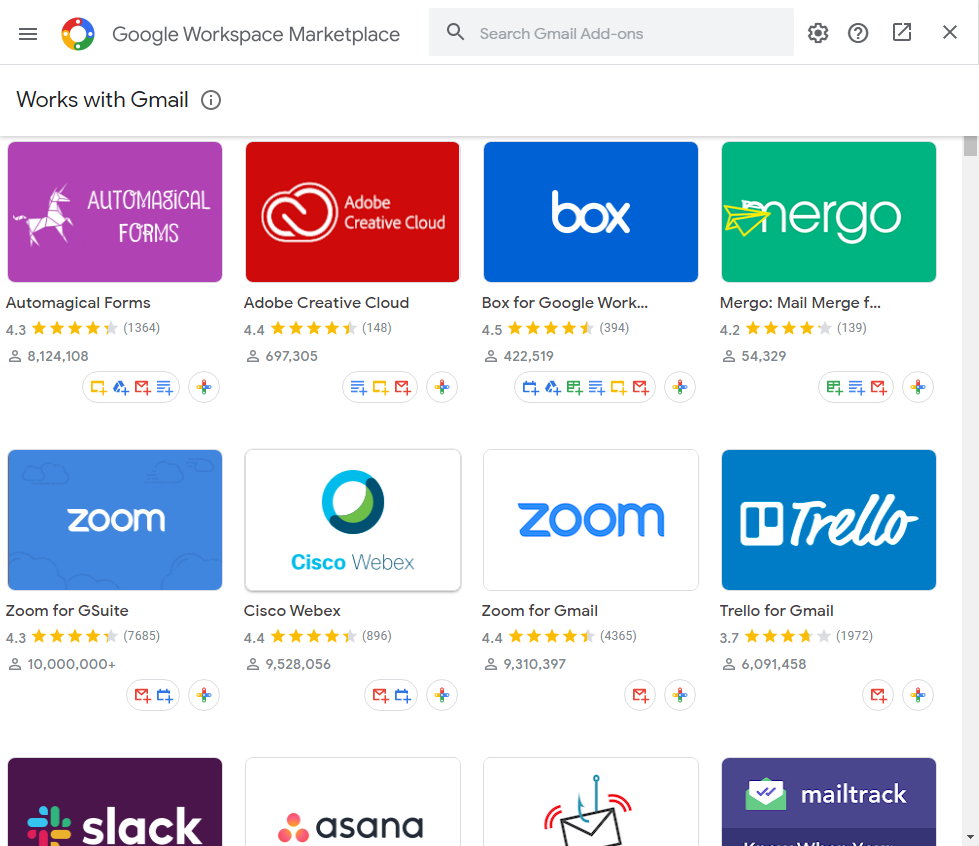
#17 Gmail Add-Ons
Gmail add-ons are a great way to extend the functionality of Gmail and provide powerful integration with other apps in your daily workflow. These add-ons allow you to integrate key actions without leaving your Gmail inbox.
What are the best Gmail plugins? While everyone's needs are different for their email workflows below are some solid choices designed to save time and make you more productive all whilst staying inside Gmail.
There has been a lot covered in this article, from Gmail tricks and settings , email management to general productivity tips that can be used with your emails. I hope that you found some value and will try out some of these in your daily workflow to squeeze out a few more drops of productivity when it comes to managing your emails inside of Gmail.
Please leave a comment below if you have any of your own tips to share. Myself and others would love to read them.
Written by:
James Mew
AI Automation Expert | former Head of eCommerce
With 20+ years in eCommerce and a proven history of scaling a 7-figure business, I know how to transform challenges into opportunities for growth. As the former Head of E-commerce for a European food tech company, I managed 14 e-shops across Europe and South Africa. Now, I specialise in helping professionals like you unlock the potential of AI automation for your business.
Over 1,800 students have already enrolled in my online courses to master these skills. Whether you’re looking for hands-on AI automation services or want to upskill with my courses, I’m here to help. Connect with me on LinkedIn to discuss your needs or join my programs to start building smarter, more scalable systems today!
Boost your productivity with AI! Learn key ChatGPT productivity hacks in this FREE mini-course designed for freelancers, entrepreneurs, and business professionals. Master smart prompts, AI-powered workflows, and more to save time and streamline your tasks.
Learn how to create a snippet that will allow you to copy Wordpress posts easily. Ok, so you will need a plugin called Snippets but it's one worth having as it allows you to extend the functionality of Wordpress easily
Google has been constantly evolving its product names over the years. Some of these changes have been minor, while others have been more significant. Let's explore these name changes and some of the reasons behind them.